This blog has moved! Click here for the new blog.

Wednesday, December 29, 2010

Make an Entrance

After sorting out my wardrobe a few weeks ago, I kept some clothes I don't wear to see whether I can alter them. I had two shirts, both of them not-wearable because of the color: white and a light yellow. Unfortunately, I am not blessed with a permanent bronze tan: I can only make that work in late summer. Throughout the other 11 months, I'm just a bit pale.


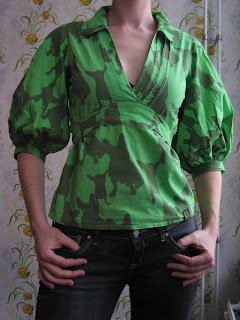
When you need color, dyeing is the way to go. I had set the goal for myself not to stay on the safe side this time, so it had to be a color other than black, grey or blue. Red, orange and yellow do not look good on me and I don't like pink, which means I had no choice but to go with 'Windsor Purple', and 'Emerald Green'. Exciting and scary, dyeing clothes! I managed to spill both purple and green on my sweater, too.


I am new to this, but color variations are apparently not all alike: the red stripes stayed red, while the grey dogs turned dark green. I quite like the effect of red on purple, I'm just glad I did not dye that one green. After the first bath the dog shirt turned fluorescent green. Not really what I was aiming for, so I had to dye it again. Adding more salt seemed to do the trick.


I also took in the side seams on the purple shirt, and replaced the white buttons for some beautiful bronze ones. Together with the purple they give this shirt a whole different look. Less summer, more chique.

I'm very happy with the results on both shirts! I'm not sure whether these colors make me less pale, but at least I'm sure to be noticed when entering a room!

Thursday, December 23, 2010

Make it fake

Last weekend was our big Sinterklaas swap. We each held a sales-pitch, explaining what we had brought and why. Remarkably, the most common reason was: "It's a nice shirt/dress/vest, there's nothing wrong with it, but I just don't wear it". Which goes to show, again, that you really need to think before you buy something. Luckily, I could pass on most of my items to my friends.

I have a 'Things to sew'-list, and on it was a blue (fake) leather jacket. Much to my delight, one of my friends brought exactly such a jacket for the swap. Hurray! It gives this jacket a second life, and moreover, saves me a lot of work. I also swapped a blue vest, which matches my formerly-XL shirt.

Anyway, the eye-catcher in these pics should be my new bag! I made this simply because my other big bag was worn out. I had a mental image of this new bag since I accidently made a nice combination of fabrics while rummaging about in my fabric suitcase. The tough brownish wool makes a nice contrast with the little beige flowers. All I had to add was the fake leather.

It closes with a magnet. My other bag had no closing at all, so I felt no reason to make an elaborate one on this bag. The inside holds a pocket for small things such as pens and my phone.

But the most handy feature is the special key pocket. Anytime you go out, no matter where you go, at some point you need your keys. I guess we've all had that moment when you're back home, a bag full of stuff and your keys are always somewhere at the bottom of your bag (or to make matters worse, you also really need to go to the bathroom). I could use the pen-pocket for my keys, but the most convenient place would be in the corner, where I can reach them anytime. I guess you could make a pocket on the front, but I don't like the idea of my keys being on the outside.


I love how much I learn with each thing I make. It was the first time I made a big bag like this, and the first time I used fake leather. It's not as fancy as real leather, but it works just as well. I think I'll be using it a whole lot more!

Tuesday, December 14, 2010

Improvements

Whilst working on a few bigger projects, I made some small improvements on earlier creations. The benefit of making things yourself, is that you can keep adjusting until they are exactly the way you want them to be. On the other hand, if you have enough time on your hands you won't get sloppy and there'll be no need for after-adjusting.

This little bag was the first thing I made since the start of this challenge. I added some D-rings to the straps, just for look of it. I've been using it on several occcasions. It can hold the essentials, plus lots of business cards.

Now for this purple bolero, I already wrote in the post I wasn't too happy with that big black button. I considered several options such as different buttons and ribbons, to give it a more playful look. In the end I went for classy and made an invisible closing.

Even this shirt wasn't quite perfect yet. Apart from some crooked seams, the buttons were not equally divided along the back. This kept annoying me everytime I looked at it, so I took them off and added an extra button.