This blog has moved! Click here for the new blog.
Showing posts with label coat. Show all posts

Sunday, March 3, 2013

Coat Details

Today I'll tell you a bit more about my coat! The pattern is Burda 10/2012 #126, Military Jacket.


I traced the pattern from the actual magazine, but downloaded the instructions. The magazine was my teachers' and the instructions in German, and Burda lets you download instructions for free. As you can see I didn't add the fringe felted wool strips that should go around the sleeves and over the princess seams.


I'm a big fan of epaulettes. It wasn't easy to set them in neatly with the sleeve cap. I also don't get how they have set them in in the example. If you have to iron the seam towards the sleeve, how can you have them standing out like that? And you have to iron the seam towards the sleeve, because you have to set in shoulder pads, too. Of which there was no mention in the instructions btw. I'm happy with how they turned out anyway.


Ah, the lining! I found the lining at the same market stall as the wool. I had different plans initially for the fabric, but then I saw this forest green wool and I just had to have it. It is most accurately pictured in the last photo below. The colors in the cotton lining go perfectly together with the wool. I used the yellow acetate from my stash on the sleeves so it would be easier to put it on. My teacher suggested I also do the upper back, but I thought that would be too much fuss. It would have given nice lines on the inside though. The instructions say to add the facings to the outer shell first, and then sew the lining in. My teacher said it would be easier to put the entire lining plus facings together first and then sew it to the outer shell, so that's what I did. I also added a thin poly batting to the lining, and sewed these layers together as one. I'm glad I did, the coat is a bit stiffer but it's really warm. And I was so tired of being cold!


This is a little detail I added. Very simple but pretty! I only use this loop when I have to though, at home I hang my coat on a hanger because I'm scared it'll get pulled out of shape by it's own weight.


The zipper was also not in the instructions. I wanted to be sure the wind couldn't get through, and I discovered that the button flap was the same width as the facing. The perfect place to insert a zipper! The only thing is that I should have made it two inches shorter at the bottom. When I sit down it wrinkles upward. It puts more strain on that area and although it will probably hold, I couls have prevented that. So my advice: when fitting your coat, sit down in it was well :)


And last but not least: my first welt pockets ever! The instructions were indecipherable, so my teacher helped me. She had me cut the lining of the pocket flap on the bias. This prevents the corners to turn upwards. After that you iron the lining towards the inside along the edges so it doesn't show when turned down. They still show a bit though, bt I like the effect of the lining on the inside. There's a couple of other tricks she taught me, like shortening your stitches at the end of a seam when there's going to be tension, like the corners of the pocket openings. And she told me not to clip my corners all the time. Sometimes it's better to just trim the allowances really close to the seam. You'll get a much nicer corners that way, like on my pocket flaps. So, lots and lots stuff learned on this coat! I'm already thinking of making a summer coat. I've still got the Minoru waiting for me...

Sunday, February 24, 2013

THE COAT

Yes, this coat deserves an all caps title. This long project has finally come to an end. I no longer have to embarass Stef by wearing my work jacket. I can parade the streets with my head held high because I have a stylish, well-fitting, warm and unique coat! Let me talk no further, I'll show you the evidence.


After my last post in which I asked you for advice on fit issues, I've improved several areas:
  1. Taking in 5 mm across the whole length of both back princess seams
  2. Taking in 2 mm at the center back seam on the upper back
  3. Taking in 3 mm at the front princess seams around the bust
  4. Resetting sleeves at pucker area
  5. Shaping and rounding off collar corners
  6. Lowering right front of collar
  7. Taking out excess fabric at the back neck
I've discussed number one through four with you, but when I looked closer there were some more areas that needed attention. Sometimes I just wanted to close it up, but every time a voice said: but what about this and this issue? And then I figured I had already spent so much time on it, I'd just as well fix every little issue. And I'm glad I did!


I took these pictures at the little town where my dad lives. It's a very old town, city rights date back to 1200 AD. It has been subject to many sieges and has been occupied by the Spanish (16th century), the French (18th century and the Germans (20th century). These bronze cannons are leftovers from the occupation by Napoleon's army and date back to 1778. Their bear the names (apparently cannons have names!) of L'intriguant (the schemer) and Le Partisan (the ally). The perfect place to show off my military coat, right?


I really love this deep, vibrant shade of green, most accurately pictured in the last two pics. This is my first coat, and maybe I could have picked an easier pattern. With all these seams there's also more room for errors. I could have know, the label saying 'advanced' and 'masterpiece'. But I learned so much, and the outcome is exactly what I wanted, so I don't really mind having spent all these hours on it! I'll do another post with some detail shots, there is lots more to tell. About welt pockets and why to cut flaps on the bias, about the extra zipper I added, and about the two different kinds of lining. You can find that post here!

Wednesday, January 16, 2013

Coat: Fit Issues

I almost started hemming my coat, but then I realised how stupid that would be. I hadn't seen it on photo's yet. And I hadn't asked you what fit issues you see. How could I forget how important these things are?

The pattern is Burda 10/2012 #106. It is not intended as a winter coat, but I lined it with some very thin fiberfill. It still needs buttons (14!). I'd love to hear what you think!


About the front: I'm not sure if there is too much room around the bust area. And should these princess seams be located so far to the sides? And I'm thinking it could do with some more shaping at the sides and maybe also at the princess seams around the waist.


About the back: There seems to be too much room at the upper back. Or do I need this room to be able to move? And what about the extra room around the lower armscyes? And there seems to be some pulling at the sleeve heads. Would you fix that? And how?

Are there any (other) fit issues you see? Please enlighten me, wise readers!

Sunday, November 18, 2012

Block Fusing Method

I wish I had clothing of some sort to show you, but unfortunately I don't. Sewing time has been none existent and progress on my coat is slow. I'm thinking of taking a week off just to sew. How nice would that be? On the other hand I've been meaning to visit a friend at Cyprus, the beautiful island in the Mediterranean Sea. Also a very good idea... Anyway, what I wanted to show you today is a block fusing method I used on my coat. Someone has probably invented this already, but I haven't come across it.

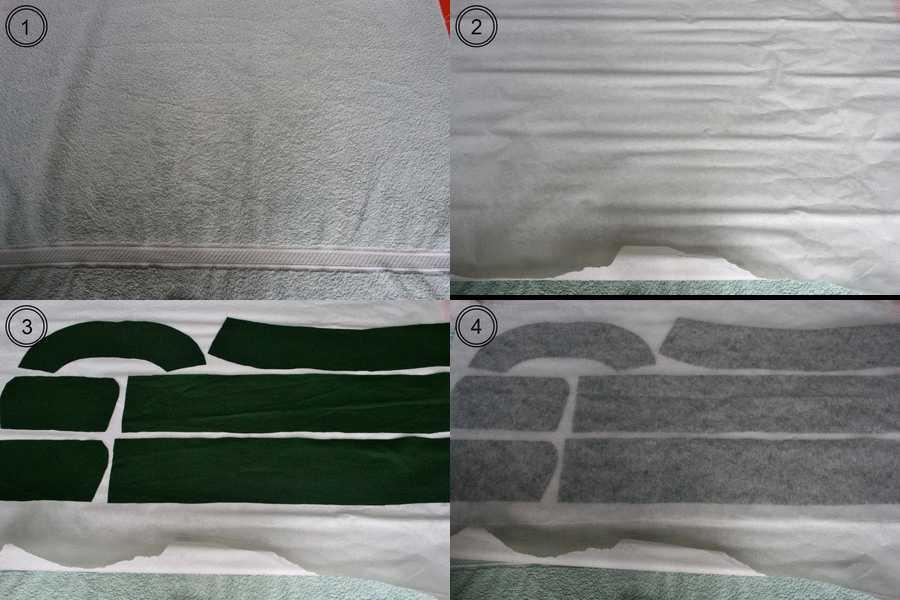
As far as I know, there are two common methods for fusing patterns pieces. One is where you cut a piece of interfacing that's the same as your pattern piece. You then lay them on top of eachother and press them together. The other method is block fusing, where you first fuse a big piece of fabric together and then cut your pattern pieces. Personally, I think both have their downsides. With the first method, you have to pin and cut twice. On top of that, it's not always easy to make them match exactly. Block fusing is easier, but you have to fuse a lot more fabric, and I have a tiny iron so the less I have to iron, the better. Plus it can also be a bit of a waste of fashion fabric. So, when I had to fuse quite some pieces for my coat, I thought of an in-between method that works really well. The gif below shows the four layers you need to create.


  1. Lay out a big towel on your cutting table
  2. Cover it with  a piece of pattern paper. This prevents the fusible from sticking to the towel.
  3. Lay out your pattern pieces. Put them close together.
  4. Spread out your fusible over your pattern pieces
  5. Iron on the fusible interfacing. Be sure you get the edges, it's allright if you fuse the interfacing to the pattern paper. In fact, this makes it easier to cut out later.

After fusing, it'll be really easy to cut out the pieces. Poke your scissors through the interfacing, between the pattern paper and the fabric and keep them flat. This is important, as it prevents you from cutting into your fused fabric. Now cut around the edge. If you've fused the edges well, and your scissors are sharp enough, you can even slide them through without cutting. (This pic also shows the beautiful sheen this wool has. Can't wait for this coat to be finished!)


The only thing you waste here is a little bit of fusible and the piece of pattern paper. This is the cheap flimsy kind, so I'd rather waste this than pieces of my fabric.


So there you have it, neatly cut, fused pattern pieces! What do you think, was this helpful? Have you seen this before? What is your favourite fusing method?

Sunday, September 23, 2012

Winter Coats

I know, Autumn has only just officially begun, but I thought if I start later I'll probably finish in Spring. I haven't bought a winter coat for 2 or 3 years now, and I want my next one to be perfect. Or at least close. I'm ready to tackle a big project like this! Here's what I want in a winter coat:

A big collar or hood
No matter how warm your coat is, if it leaves your neck bare you'll still get the chills when it's windy. Brrr I get chills just thinking about it. Yes you could use a big scarf, but I don't want that to be absolutely necessary.

A zipper
Buttons look pretty, but again, the wind will blow right through. Especially when you're cycling, and you know how cycling is part of our cultural genes. Even a zipper can be a weak spot in your warm cocoon. Preferably, I'd like a zipper with a facing behind it.

Some length
The coat I have right now is pretty cool, but it leaves an open spot right at my belly. This is the second most important place you'd want to keep warm, so the jacket has to at least fall below the belt. Even better would be mid thigh.

So what patterns would fulfill these criteria? To my surprise, I found nothing on BurdaStyle that came close. And then I spotted this magazine, Ottobre, that had not one but three candidates in it. Ottobre is a Finnish magazine translated in Dutch, German, English and Swedish. This is the autumn/winter issue, it only comes out twice a year. It has 19 patterns with a big size range, from 34 to 52 (6-24 in US sizes). As you can see they use models in al sizes and ages to show the patterns on. They have only a meagre website, but they also have a blog on which you can find more information about the patterns. They also sell fabric on Etsy.


This jacket attracted me mainly because of the colour. I has no real closing, except for an oversized safety pin. This doesn't make sense to me. What use is a winter coat if it has no proper closing? I do like the overall style though.


This one is a nice and simple jacket, with a cosy collar and raglan sleeves. It has no facing behind the zipper. I guess you could add one if you wanted.


Looking at the pattern, this seems to be the same pattern as the first one, only shorter and with a zipper. I like the asymmetrical zipper. This coat is simple and yet a bit different. I'd change the hood into a regular one though, pointy hoods are a bit too odd for me. Otherwise, I think this is my no. 1 choice! What is up with this fabric btw, isn't it hiddeous?

I find it pretty hard to decide on a pattern. It's different from anything else because you only make one. With dresses, you have plenty of choice and you can sew as many as you like. I guess you could sew more than one coat, but seeing that I've never made one before, let's just start with one. (Actually I did make one, about 6 years ago. It went reasonably well considering my skill level, but I couldn't figure out the lining so I had that part done by a professional seamstress.)

For those of you wondering about the other patterns, here's an overview. I like how they give their drawings some texture, it makes them look more alive. I haven't sewn anyhting from it so I don't know about the instructions. It's all text, no drawings.


Nothing too spectacular (except for that evening dress, which looks spectacularly awful), but those jeans look interesting. They look good in the pictures, although not one picture in the magazine shows them completely. They do have some up on the blog.

What about you, have you ever sewn from this magazine? And are you planning to sew a winter coat this year? Have you found a pattern yet? I'd love to hear!