This blog has moved! Click here for the new blog.

Sunday, November 18, 2012

Block Fusing Method

I wish I had clothing of some sort to show you, but unfortunately I don't. Sewing time has been none existent and progress on my coat is slow. I'm thinking of taking a week off just to sew. How nice would that be? On the other hand I've been meaning to visit a friend at Cyprus, the beautiful island in the Mediterranean Sea. Also a very good idea... Anyway, what I wanted to show you today is a block fusing method I used on my coat. Someone has probably invented this already, but I haven't come across it.

As far as I know, there are two common methods for fusing patterns pieces. One is where you cut a piece of interfacing that's the same as your pattern piece. You then lay them on top of eachother and press them together. The other method is block fusing, where you first fuse a big piece of fabric together and then cut your pattern pieces. Personally, I think both have their downsides. With the first method, you have to pin and cut twice. On top of that, it's not always easy to make them match exactly. Block fusing is easier, but you have to fuse a lot more fabric, and I have a tiny iron so the less I have to iron, the better. Plus it can also be a bit of a waste of fashion fabric. So, when I had to fuse quite some pieces for my coat, I thought of an in-between method that works really well. The gif below shows the four layers you need to create.
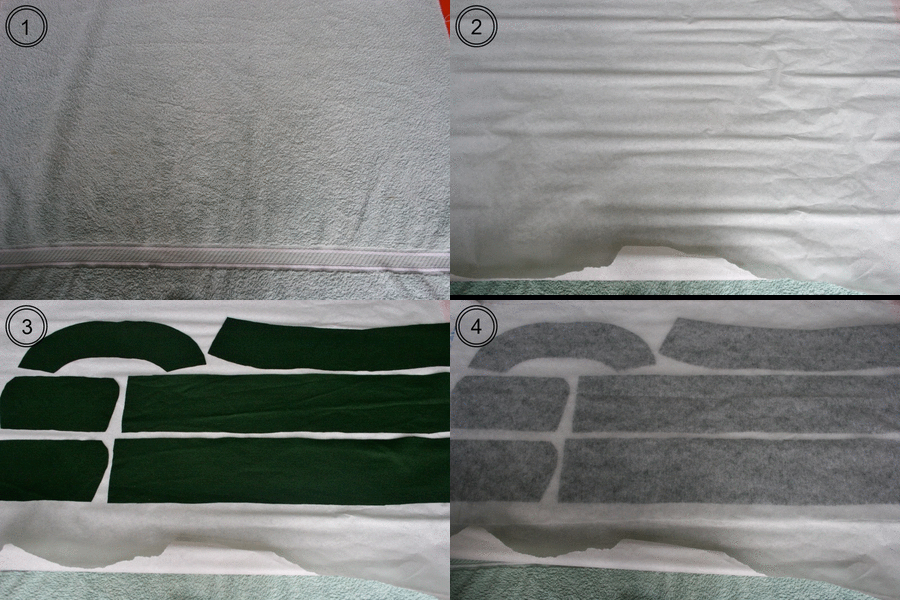

  1. Lay out a big towel on your cutting table
  2. Cover it with  a piece of pattern paper. This prevents the fusible from sticking to the towel.
  3. Lay out your pattern pieces. Put them close together.
  4. Spread out your fusible over your pattern pieces
  5. Iron on the fusible interfacing. Be sure you get the edges, it's allright if you fuse the interfacing to the pattern paper. In fact, this makes it easier to cut out later.

After fusing, it'll be really easy to cut out the pieces. Poke your scissors through the interfacing, between the pattern paper and the fabric and keep them flat. This is important, as it prevents you from cutting into your fused fabric. Now cut around the edge. If you've fused the edges well, and your scissors are sharp enough, you can even slide them through without cutting. (This pic also shows the beautiful sheen this wool has. Can't wait for this coat to be finished!)


The only thing you waste here is a little bit of fusible and the piece of pattern paper. This is the cheap flimsy kind, so I'd rather waste this than pieces of my fabric.


So there you have it, neatly cut, fused pattern pieces! What do you think, was this helpful? Have you seen this before? What is your favourite fusing method?

Tuesday, November 13, 2012

Pattern yes, magic no

I don't think there are many garments I instantly label as a NO. In fact, this could be the first one. I participated in Marianna's Pattern Magic Challenge, to get myself to make time for some pattern drafting. I won Pattern Magic vol.3 through theperfectnose's giveaway. I selected a piece I thought was interesting, but normal enough to actually wear in case it turned out well. I like the apple peel pants but thought the'd be too easy, so I chose the Stopper. Normally, the book says, things that twist needs something to hold them, or they will twist back into shape. This is called adding a stopper. Now I am still not quite sure what it is exactly that stops this top from twisting: explanation is minimal to non existent with this book.

So, seen the pretty woman on the right gracefully modelling the Stopper? Now lo and behold, for here is my version.


Ai. Not quite the same, is it? This just looks like a top sewn by someone who's just seen a sewing machine for the first time. There's several things wrong with it, and most of them are ofcourse my own fault.
  • Fabric. I used fabric from my stash, but I should have bought some lightweight jersey. This is a medium weight knit. It just doesn't drape that well.
  • Too small in the shoulders. It really pulls around my right shoulder, making the armcuffs stand out and pulling on the diagonal twist. This also makes it not comfortable to wear.
  • Using the fabric instead of ribbed band. It doesn't have enough stretch. I had to make the neckband 10 cm longer to get it over my head.
Not all can be blamed on me, though.
  • As I said, minimal instructions. It says 'stretch and sew' and the drawing shows which parts to stretch, but it doesn't say how much. As far as you can? Just as much as the length of the other side? 3,5 cm? Is this obvious to more experienced sewists?
  • This model probably would look good in anything. But that's also sort of her job, so I can't really complain. I'm just wondering if this would look weird on me anyway.


Allright, this one looks slightly better, but that's just the angle. There also seems to be a lot of excess fabric at my waist on the right side. Although the outcome is not really wearable (main reason being that it's uncomfortable), I really enjoyed drawing the pattern. I've put in Roman numbers for those of you who want to give it a try. The book just says 'draw up from the waist'. I do feel like my pattern drawing lessons have helped me here, I would've been clueless otherwise. I started with the first half, then cut it out and traced it on another piece to add the other half. Mainly because my pattern paper wasn't wide enough, but it also gives you an advantage. When you have to move the armhole, just use the cut out as a mall instead of drafting it again.


This failed experiment has not discouraged me. On the contrary, the other PM books are on my wishlist for Christmas. These patterns are a challenge for my newly found love for pattern drawing so I'd be happy to try a few other even if I don't sew them up in the end. Thank you Marianna for hosting this challenge! I hope the others have fared better :) View them all here.

Saturday, November 10, 2012

I'm a Maker

This may come as no surprise to you, but it sort of does to me. With a masters in philosophy, I've thought for a long time that I'm mainly a Thinker. It could be that this has changes over the years, but now I find myself to be more and more of a Maker.

Last weekend I attended Startup Weekend here in my hometown. Startup Weekend is an event for entrepreneurs or people who want to become an entrepreneur. In one weekend you work on one idea with your team, going through the whole process of business model creation, coding, designing, and market validation. That may sound a bit boring, but it is in fact truly inspiring and amazing. The weekend starts with everyone pitching their idea for a startup (mostly web-based, but it could also be a product). Then everyone votes, the ideas with most votes are picked and then you form teams. After that, you've got until sunday evening to build your business. My reason for going was for learning a bit on how to start a business, and get some ideas on what I might need to get there. What I got was a crazy amount of energy, a team full of enthusiastic and creative people, great food, and also some ideas on how to build a business. It felt like a grown up camp, where everyone is temporarily living together, having lots of fun and working together. For three days, I lived in a paralell universe where the only thing that mattered was our startup. I did not know that working on a great idea with great people can give you that much energy. I felt like bouncing and shouting all weekend.

Anyway, on this team I was a Maker, too. We built a real scale prototype of a modular urban farming system we developed. I had taken monday off for some chilling and sewing, but I couldn't stop building. So I made something I bet every sewist would like to have: a little rack to hold my thread spools.


Pretty neat, eh? I made it to fit my new sewing cabinet (which is the former Xbox games cabinet). To complete the collection, I also got myself some french curves and a big case for storing drawings, for my pattern pieces.


Whether you're a Thinker or a Maker, if you're interested, check the StartupWeekend website. With 313 events planned all over the world, there is bound to be one near you! I hope you go and get as much energy and inspiration as I did.

Saturday, October 27, 2012

Thrift Store Treasures #7

I bought this skirt for 3 euros last month in Antwerp, Belgium. There was a matching shirt, but although I like the print, that would have been a bit too much. The thing that fascinates me about this skirt is the split in the middle. Why on earth would you want a split there? That center front seam made the refashion process a bit more difficult.
I had a different skirt in mind, based on a RTW skirt I owned. I loved that skirt, but unfortunatey the mice that we have in our walls tend come out at night. And I happened to have left the skirt lying on the ground, withdog treats in the pockets. Instead of just looking for an easy way to get to the treats the mice just ate right through the fabric. They did the same to two pairs of jeans, including the mustard one. (In case you are reading this, mice, WAR IS ON. Please leave my house or I'll gently catch you in animal friendly traps and put you outside in the cold.) The skirt couldn't be saved, which was sad, but also a good opportunity to take it apart to see how it was constructed. Thank you Sewing for providing a silver lining!


I ripped every seam to get the most out of the fabric. And although it looks as not much has been altered, I barely had enough fabric for the design I wanted. My mom thought I should make the skirt really short, but with winter coming, I went with knee length again.


The original skirt already had in-seam pockets, but I wanted big pockets that stand out from the skirt. The colours of the lining and the ribbed waistband matched perfectly so I recycled them. There's no zipper, the back of the skirt is sewn to a stretched waistband. The front of the skirt is smooth, but the back looks gathered and has the elasticity so you can get it over your hips.


Above pic shows my hip and a pocket. I really like the finish of this skirt. You sew the waistband and skirt together with the seams on the outside, and then sew a horizontal strip over the seam. This way you don't have to finish any seams. There's a lot more to show and tell on this skirt actually, but I'll wait with that for later. It's enough to say I'm happy with this refashion, and it made me discover the joy of wearing fluttery skirts in cold weather!

Wednesday, October 17, 2012

Knit Sweater For ... Erm...

...next year? Yes, I did it again: making something for summer when it's basically almost winter. I so love this sweater though! I'm planning to sew up some Renfrews to wear underneath. I've already shown you the pattern I used, from the 1980 July edition of Ariadne.


I can't really say how long it took me in hours. I just know I started knitting in May or something. It's not that the pattern is difficult, it's just that I tend to get bored halfway. The consequence being the I now have a sweater with lots of holes and knit in cotton to keep me warm this winter. I'd better get started on those longsleeves :)


In short, the pattern goes like this:

1: Number of stitches must be divisible by 18 + 2 stitches on each side
2: Knit 4 rows in st st
3, 5 & 7: sl 1, k2tog 3x, *yo k1 (6x) k2tog (6x)* rep. between *, end with yo k1 (x6), k2tog (3x), k1
4 & 6: Purl
8-12: Knit

That's it! Could be nice for a slouchy beret, too. I'll stick to socks and mittens for a while now, I don't think I'll be needing a thick sweater next summer. What's on you're needles? Do you knit as I do, or do you knit one season ahead?