This blog has moved! Click here for the new blog.

Wednesday, June 29, 2011

From S to Awesome

Remember the second hand men's shirt I refashioned back in november? Yes? Well, I never wear it. However nice it fits me after refashioning it, it's still just a shirt. Nothing special about it, even the fabric is a bit boring. So, when I saw how Sarah (aka Lyndi, through Burdastyle) had a far better idea for her shirt, I just had to give it another go!

I skipped the lace for it would make my shirt a bit too girly, and instead I just cut the sleeves off, leaving about 8 cm at the shoulders. The collar was left unaltered the last time, and really still an XL size. I took off the upper part of the collar (I had actually already done this a month ago), so it would get a kimono look. I also made some much needed bust darts. With the belt and the standing collar, it made for an amazing change of style in just a few hours work!


Like Sarah, I used the sleeves to make an Obi belt. I interlined it with H200 vlieseline from the market so it wouldn't wrinkle too much. Then I lined it with a gauze-like fabric that's a bit rough, so the belt would sort of stick on. I sewed in some elastic loops and four spare buttons. And voilĂ , a neatly finished sleeve-belt!


And, last but not least, I discovered that the boring buttons actually had a fun backside, white with coloured specks. So I flipped them all, and my new shirt was finished! Not entirely my idea, but I really like it now and have already worn it a few times to work. It just goes to show, don't give up on your unwearables too easily!

Tuesday, June 21, 2011

Dance pants

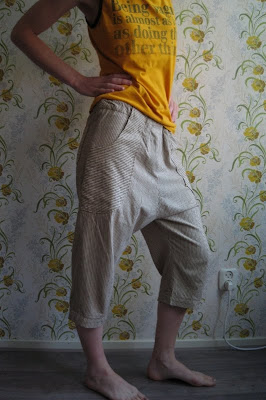
This post was originally called 'Playing with stripes', referring to the three directions the stripes on my pants are placed in - vertical on the pipes, horizontal on the pockets and diagonal on the waistband.

Until I took my pants dancing (unintended) and we had the time of our life.

I made them a few weeks ago, but I wore them a lot right after I made them, so before I could take decent pictures there were stains all over them. I washed them, thinking I'd make pics after that. But I didn't. Instead I wore them out dancing, and spilled red wine all over them.

(These pics don't do them justice either, but I was in a hurry and had no time to iron them or do some creative posing.)


It was a 90's party, and this outfit (incl. Allstars) totally resembles how I remember the 90's. You know who also rocks low crotch pants? That's right - MC Hammer. I did some modest Hammerdancing myself that night (late that night), and I fully understand MC Hammer's choice of low crotch pants. It gives you all the freedom of movement you need for jumping and swinging your feet like that.

Anyway, let's talk about the pants! My first low crotch pants ever, and I wasn't sure about them until after they were finished. When I saw the fabric at the market (2,50 a meter!) I knew it was destined to be pants. I used the back of a Burda pattern, but altered the crotch height and the length. I copied the pockets from pants I made a few years ago. Needless to say they are very comfortable, and they can be combined with sneakers as well as with some heels.

Well there's not much else to say really, except that I really love making pants. I'm glad they don't require sleeves, for one thing. I think I'm going with high waisted next time. Yay for pants!

Wednesday, June 15, 2011

Good loot

Excusez-moi for my lack of posting last week! Thoughout the week work and our garden took up most of my time, while our weekends were filled with family visits. I got some great produce out of it all though: the zucchini's are growing like crazy, and our family provided me with lots of sewing supplies.
First, I got this sewing box from my mom. She used it for her sewing stuff, but she doesn't sew anymore. I remember always being fascinated by the way it opens. How cool is this? All my sewing stuff fits in there, and it's so much better organized.


I also got some great leather scraps from Stef's grandmother. She's the one who made my leather bag, and she had some wonderful pieces left. I especially like the blue-greyish ones, and the soft purple ones. These will make for some pretty bracelets! Maybe even combined with the crocheted thingies (no idea what they're called). It would be a shame not to show this meticulous handwork somewhere it can be seen, right? And what about those amazing wooden bag handles? They were hand painted by Stef's aunt, and they will definitely be used for my next big purse. The wool is alpaca, brought from South America by Stef's sister, destined to be a warm bonnet. One could not hope for a nicer family in law!


Funny how those leather pieces are shaped like hides. As if they really came from tiny animals.

I picked up the blue fabric at the market, for - again - just € 1,-! There was nothing wrong with it, apart from some bird dropping which the washing machine took care of. It's a 2x3 metre piece, it seems to be a linen blend of some sort. It's supposed to be a curtain, it has a weighted hem. But think it's excellent material for a pretty sundress, don't you think?

Saturday, June 4, 2011

Baaahsics

Every wardrobe needs a few basics. When you stop shopping, eventually the time will come when your store-bought shirts will have to be replaced. I've arrived at this point a while ago, but was sort of ignoring it. Sewing basics simply didn't seem like much fun, and maybe not even blog worthy. Or so I thought, until I made this basic striped T-shirt.


Well the pics sprak for itself really - it's a T-shirt :). I could't keep myself from adding some details, hence the epaulettes at the neckline and the hem, with fabric covered buttons. The one at the neckline also hides a small pleat I needed to make in order to keep the bias flat. The bottom one pulls up the hem, creating some a-symmetry. I gotta give you guys something to look at, right? I used the same pattern I made for the basic floral shirt and the polka dots top. We were at a sheep shaving event (yes, really), introducing our sheepdog to her future work objects. I think we were more excited than she was.


Even though it's a simple design, it made me realize I still have something to learn when it comes to bias binding necklines, matching patterns (didn't even give it a try) and choosing the right tension for jersey. And I need to do some study on sleeves, I still don't really get them. The advantage of sewing simple garments makes you focus on perfecting these techniques instead of figuring out a difficult pattern or instructions. I'm already looking forward to my next basic top!

Monday, May 23, 2011

Men's shirt Refashion

The conversation went like this:

Me: You don't need this anymore, do you?
Stef: Hm, I don't know
Me: It doesn't suit you very well anyway
Stef: Well, I guess not then

And thus, a very nice light blue gingham shirt was mine! Muhaha, evil plans are the best. As you can see some work needed to be done. I wanted to keep a loose fit because the fabric is perfect for it: light and supple. And I love how oversized shirts are comfortable without being sloppy. I took in between pics this time, so I can explain what I did.

I started with chopping off the collar and the sleeves at the seams. Chopping them off only works if you have enough fabric left for new seams. I was careful with the collar, taking it off cm by cm, until it had the right shape, indicated by the pink line. The front pocket was too big and at the wrong place, so I took it off.


I wanted the sleeves to fall right below the elbow so I took them in at the top, about 10 cm including seam allowance. Be sure to follow the curve of the armhole when tracing the line. The shoulders were also too big. To keep the size of the armholes, trace a horzontal line from the bottom of the armhole to the point where it meets the line you trace around the armhole. This point automatically indicates how much to take in at the sides. In this case, it was about the same as I had wanted to take in at the sides, but I don't know if that will always be the case.

I really like how the cuffs turned out. I sewed the plackets together, removed the buttons and folded the cuff up. I topstitched the cuffs so they would stay in place, and show their round shapes. Instant removal of the masculinity of this shirt! The sleeves already had some pleats on the outside which now give it some body. I replaced the button on the placket with a shiny , slightly bigger blue one which covers up the buttonhole.

A few other things I like about this shirt: French seams! It's the first time I used them, and it's so easy and neat! I'm thinking the green skirt could really use some french seams, maybe I'll have to do a remake of that one. I found Tasia's tutorial very helpful. And check out the label. Sorry for chopping up your shirt, Master Shirtmaker! But thank you for choosing a non-iron fabric :)


And now, the endresult! I'm really happy with how the shirt turned out, but I do need your help on deciding: left or right? I made a small bow out of the pocket, to add something at the neckline. I think it suits the shirt, but does it suit me? (You'll understand this question if you've read this post) What do you think?


P.S. The hat's purpose is to cover up a bad hairday, it's not like I wear it all the time :)