 | The title of this post could easily have been 'I wish I made this'. It was a question I got asked a few times actually, and I was sorry I had to answer with 'no'. I found it in a thrift store whose racks I've had my eye on for a while. It's the kind of store that only sells the good vintage stuff, not the place to find 1€ bargains. I thought about altering it at first. Maybe lower that neckline, take some length off the skirt. But in the end, my sewing machine did not come near this dress. I thought I'd share it anyway because I love it so much! I find the shape and the use of batwing sleeves in combination with the placement of the stripes (OF WHICH SOME ARE MUSTARD) very inspirational . It also makes me feel like a woman. Which is OK for someone who just turned 28. The label says C&A, and also: Made in West Germany. Last time I looked, West Germany ceased to exist as such when the Berlin Wall fell in 1989. So this dress must be from before that time! Cool :) Our vintage wall paper had the same label by the way, made in West Germany. And my boots are from the 80's, too! I think I've found my time period :) |
 | |
Sunday, March 11, 2012
Thrift Store Treasures #4

Thursday, March 8, 2012
Mustard Hoodie: The "Pattern"
| [[ UPDATE (27/2/2014): We have released this design as a PDF pattern! What started as the yellow hoodie has now become an actual pattern with a lot more design details than the original. More flattering, better thought through, a sweater and a dress version, and a collar option next to the big hood! I strongly advise you to buy the pattern instead of following the steps below. Those measurements are not accurate and I do not guarantee a good outcome, unless you are creative and willing to tweak it until it works. I know it was me who wrote this, but it was also three years ago when I had just started sewing. You've been warned ;) So go check out the pattern here! ]] At first I thought it'd be nice to get people to email me if they wanted the measurements of the mustard hoodie. That way I could 'track' how popular it was. I was really excited to see people were interested, and I still get a few requests every week! But, I thought I'd make it easier for you (and me). Below is the content of the email I used to send: much easier for you to access it this way! It's not really meant as a tutorial though, and I don't think it is suitable for beginners. I'd still really like to see the outcome if someone manages to make it! Check the previous posts about this hoodie: The Reveal How It's Made | .jpg) |
Important tips:
- These measurements are in cm
- I can't guarantee it will work out perfect with these patterns. I'm sorry I can't make it any easier for you, when I made this I had no idea the response would be so overwhelming. I did not write down the whole process, I just tried them on, adjusted, tried again and so on, during all the steps below. If you keep this in mind, it should work out fine!
- Make a muslin, for the reasons stated above. In that way you're sure to have a well fitting hood.
- For the sweater you can use a standard V-neck pattern, or trace a sweater you already own (as I did). You can adjust the size of the V according to your hoodie pattern.
Quick sewing order:
- Sew the back of the hood together (the edges marked with a *)
- Finish the seam with bias tape
- Sew the two frontpieces together between the triangle-marks. Sew with right sides together, then turn inside out, press.
- Sew the back of the hood to the neckline
- Sew the part of the rim and the frontpiece that will be on the outside to the sweater and the hood (you can do this in one go). Where the rim meets the frontpiece again, put the rim between the two frontpieces.
- Sew bias tape along the neckline
- Sew the inside corner of the frontpiece to the rim, at the place where they meet again.
- Iron the seams of the rim flat. Take the inside of the rim together with the half of the hood-seam that's pointing backwards, and sew them together using bias tape. This way the inside part of the rim is attached to the hood without making extra seams visible from the outside. Also use bias tape along the whole inside of the frontpiece: you an just take a very long piece and use it for the front piece and the rim together. See photo below for a view of the hood inside out.
- Handsew the inside frontpiece to the sweater. The buttons will also hold it in place.
- Handsew the outside corner of the frontpiece to the rim.
I hope it will work out this way. If you have any questions, don't hesitate to ask me! Or if you have any ideas about better solutions, I'd like to hear them too. Good luck!
 | .jpg) |
Wednesday, March 7, 2012
(Mini Skirt Update: Folding Video!)
After hearing some rumours about ruined fabrics, crying mothers and wasted hours, I thought it was time for a video on how to fold the miniskirt. It's not that hard! It's just hard to express in words and drawings :) I hope this helps. I've also added it to the tutorial. Good luck!
Sunday, March 4, 2012
All Serger Sweater
Before I start on new fabrics I thought I should use up some of my stash. This sweater has been on my mind for a few months now. I bought the fabric on sale for 3 euro per meter. It's a soft medium weight knit fabric. I liked that both the front and back could be used, so I set out to think of a design that would utilize that. I'm really glad I waited until I had my serger to sew this, because it only cost me about 6 hours to put it together! With this sweater I've also switched from using pattern paper to drawing directly on muslin. This has several advantages: 1) It can withstand my clumsyness. I accidently rip pattern pieces all the time. 2) I can try it on immediately, which is necessary because I draw most of my patterns myself which means more fitting turns 3) Its easy to pin onto the fabric, and it also sort of sticks to the fabric.
I wanted to try and see if it would work to draw the bodice and collar as one piece instead of making a separate collar. I used the Renfrew top as a bodice block and expanded it for the collar. It worked out well, it's a nice design feature. I like the stiffness of the cowl-collar, it can be shaped into different forms. Not having a separate collar does mean that there has to be a seam down the middle. An excellent opportunity to add an extra feature by using the back of the fabric in the middle. It looks grey in the picture, but it's brown and white. I kept the cuffs and the waistband of the Renfrew for an easy finish, and I think it suits this design.
.jpg)
I'm very pleased with it, I think I've managed to give the design a certain boldness while using a kind of fabric that could look a bit twee when using the wrong pattern. And it's the first time I've not used my regular sewing machine at all. The inside looks perfect and almost store bought - except for the hand sewn collar edge. It's amazing how easy sewing knit and stretch fabrics has become with my serger!
.jpg) | .jpg) |
I wanted to try and see if it would work to draw the bodice and collar as one piece instead of making a separate collar. I used the Renfrew top as a bodice block and expanded it for the collar. It worked out well, it's a nice design feature. I like the stiffness of the cowl-collar, it can be shaped into different forms. Not having a separate collar does mean that there has to be a seam down the middle. An excellent opportunity to add an extra feature by using the back of the fabric in the middle. It looks grey in the picture, but it's brown and white. I kept the cuffs and the waistband of the Renfrew for an easy finish, and I think it suits this design.
.jpg)
I'm very pleased with it, I think I've managed to give the design a certain boldness while using a kind of fabric that could look a bit twee when using the wrong pattern. And it's the first time I've not used my regular sewing machine at all. The inside looks perfect and almost store bought - except for the hand sewn collar edge. It's amazing how easy sewing knit and stretch fabrics has become with my serger!
Sunday, February 26, 2012
Celebrate Good Times
Things are going rather well lately: I've graduated in the best way I'd hoped, and found I myself not one, but two new jobs within a few weeks. On top of that, last saturday was my birthday. More than enough reasons to celebrate the good times, and for a sewist this means spending some quality time at the fabric store. By now, everybody knows all things related to sewing is what makes me happy. My best (early) birthday present was the serger. If you haven't got one yet: get one! It takes some time to get to know it, but after that it saves you so much time. It has allowed me to use the words 'sweater' and 'whipped up' in the same sentence. (More on that soon!) And it looks all pretty on the inside too. I used to show people my clothes were handmade by showing them the ugly unfinished inside, but now I'll have to find another way to convince them.
All that I needed now was fabric, and my parents in law provided me with the means to get some of that. I went to a city nearby because the fabric shop in my town is not very good. It was still hard to find fabric for the Minoru, I couldn't decide what colour I wanted. After an hour I stumbled upon a very pretty, medium weight wool coupon in teal. It was 1,5 yards, so all I thought was well, I'll probably won't be able to make the hood. Ha! If I want to use it I'll have to make it without sleeves too. Very bad choice, but the wool is still pretty, and the satin lining I got for it is perfect. Maybe it'll be a suit jacket? I also got some jersey with diagonal black and white stripes to use with the Renfrew, a black cotton with some stretch and lining for a pencil skirt and some brown fluttery jersey. I'll have to go again soon to get some real Minoru fabric!

| I'm also using my grandmothers sewing machine now, an old Toyota, and wow, she is so smooth! She makes sewing a real pleasure after my last machine. Very well maintained and all the accessoires are complete. My workspace is starting to look serious now! Although it would be nice to have a little bit more space, it still works. I draw and cut downstairs on the big table, and then sew upstairs. | 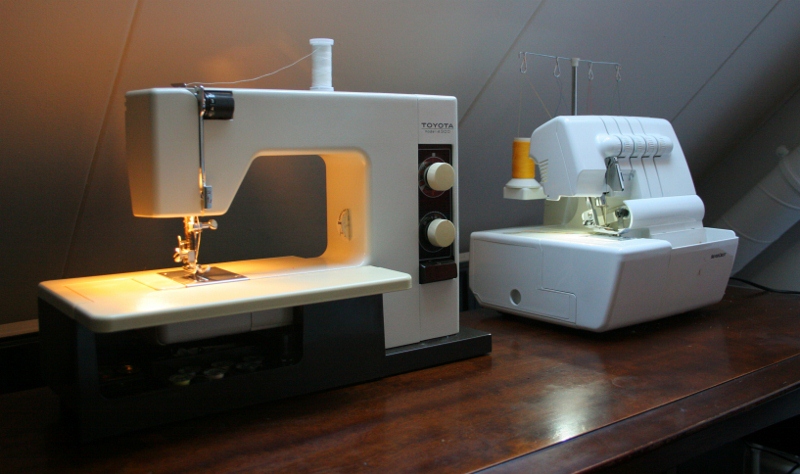 |
 | Then I treated myself to some goodies from Sewaholic: the Minoru jacket and the Renfrew top. The Minoru seems like a great first jacket. I've actually already made a jacket before and it turned out allright, but I had to have the lining done by a shop because I couldn't figure it out. So I'll count the Minoru as my first since this time I'll actually know what I'm doing. The Renfrew seems (is, I know by now) a great starting point for all sorts of jersey and knit shirts. |
All that I needed now was fabric, and my parents in law provided me with the means to get some of that. I went to a city nearby because the fabric shop in my town is not very good. It was still hard to find fabric for the Minoru, I couldn't decide what colour I wanted. After an hour I stumbled upon a very pretty, medium weight wool coupon in teal. It was 1,5 yards, so all I thought was well, I'll probably won't be able to make the hood. Ha! If I want to use it I'll have to make it without sleeves too. Very bad choice, but the wool is still pretty, and the satin lining I got for it is perfect. Maybe it'll be a suit jacket? I also got some jersey with diagonal black and white stripes to use with the Renfrew, a black cotton with some stretch and lining for a pencil skirt and some brown fluttery jersey. I'll have to go again soon to get some real Minoru fabric!

Subscribe to:
Posts (Atom)